
Sunday, March 15, 2015
Spring Cleaning and Organization Challenge - 2015

To help myself and readers make the most of spring cleaning, I put together a calendar to bring you all the way from the first day of spring to the last day of spring. There are different chores and projects for most days to get you through the next three . I didn't include routine chores, like washing dishes or routine bathroom cleaning. I focused on chores that I never seem to prioritize, but that would make a big difference in my house.
Whether you own a home or live in an apartment, you can adapt this calendar to meet your needs. You can download the calendar and use it as is or adapt it to meet your needs.
Spring Cleaning and Organization Challenge Rules!
* The challenge starts on March 20 and ends on June 20.1. Refer to the links to the calendars at the bottom of this post. Feel free to substitute items if one or more of the items don't make sense for your home.
2. Work ahead (or behind) as needed. The main goal is to finish all items by the end of each week and the entire calendar by the end of spring.
3. Go to the Missy Inspired Facebook page and click "Like." Feel free to Share this post on Facebook with your friends. Comment on this post by 3/20 to sign up for the Spring Cleaning and Organization Challenge. Post your progress every few days and share the challenge with your friends!
4. Keep up with your regular cleaning. I didn't include standard cleaning items on this calendar because I wanted to focus on the items that I never seem to complete. Here is my typical schedule:
Daily:
- Load and run dishwasher
- Clean and wipe down counters
- Clean and wipe down dining room table
- Take out the trash
- Make the beds (mornings)
Weekly:
- Sweep the floors
- Mop the floors, if needed
Twice monthly:
- Clean the bathrooms
- Vacuum
- Change bed sheets
Downloads
Download and edit Excel files - you can download this file, then save and edit it on your desktop.Download PDFs for each month:
March
April
May
June
Monday, May 20, 2013
A Mantel a Month: Spring Mantel

It's finally time for my spring mantel. This post has been in the works for a while now. I hope you like it!
What's On My Mantel
Left Side
Easy Pastel Spring Candle and candle holder, Paper Medallion Spring Bouquet.
Center
Spring sign (purchased from the Christmas Tree Shop)
Right Side
Washi tape picture frame (project to come), tissue paper flowers with yarn vase (project to come), and Easy Pastel Spring Candle and candle holder.
More Mantels
Thursday, April 25, 2013
Paper Medallion Spring Bouquet

After I finished my Spring Paper Medallion Wreath, I still had a lot of medallions left over. I decided to put together this cute spring bouquet to go with my spring mantel. Here's how I did it!
Materials and Supplies
- Scrapbook paper
- Hot glue gun
- Floral foam
- Lollipop or popsicle sticks
- Buttons
- Flower pot

How to Make This
1. Make the paper medallions.
See the full tutorial that I did for my Paper Medallion Spring Wreath for how to make these.
2. Glue a button to the center of the medallion.

3. Apply hot glue to the lollipop stick.

4. Squeeze the folds of the medallion around the lollipop stick (with the glue still hot).

5. Cut a piece of floral foam and put it into the flower pot.

6. Place the finished medallion "flowers" into the floral foam, to keep them in place.
Place the "flowers" at different levels.
Link Parties
Click here to see the link parties I visit each week.
Wednesday, April 17, 2013
Spring Chalk-Bird Flower Pots
Aren't these pots pretty? I made them for the grandparents for Easter. I'm pretty happy with how they came out. What do you think?

Materials and Supplies
- Terra cotta pots
- Chalkboard paint
- Craft paint (pastel colors)
- Black craft paint
- Stencil
- Foam brush
- Foam spouncer
- Paint brush
- Chalk

How to Make This
1. Paint on several coats of chalkboard paint.
I started with the chalkboard paint. However, since the pots are so porous, it took SIX coats of chalkboard paint to get enough coverage. Next time, I would start with a primer or craft paint first to get more coverage.


2. Prepare your stencils.
I bought a wall stencil with three birds. I decided to cut this into three birds so each pot would be different.
3. Tape the stencil to the pots.
Try to get them flush to the pots so there are no gaps.
4. Use the foam spouncer to fill in the stencil with craft paint.
Use a light touch when you do this so the paint doesn't seep under the stencil. I did three coats of the blue paint.
5. Paint the edge of the saucer rim.
I just dabbed it on with the spouncer. At the end, I tried to draw a straight line with a paint brush, but I'm not sure that was necessary.
6. Untape the stencil.
The lines of my stencil weren't as crisp as I had hoped. I used a paint brush and black craft paint to make the lines a little smoother.
7. Write the name on the pot with chalk.

8. Add flowers or herbs to the pots.


Link Parties
Click here to see the link parties I visit each week.
Monday, April 8, 2013
Spring Paper Medallion Wreath

I put this pretty wreath together over the weekend and I'm thrilled with how sweet and springy it came out! Here's how I made it.
Materials and Supplies
- Wreath form
- Yarn
- Scrapbook paper (various patterns)
- Hot glue gun
- Paper cutter
- Burlap
- Stones (those clear ones from the dollar store)
- Letter stickers
- Ruler
- Pencil

1. Wrap the wreath form in yarn (not shown).
Wrap the yarn around the wreath. Keep it tight, so none of the wreath shows through.
2. Measure the pieces of scrapbook paper.
I measured a 12x12 paper into 4x6" and 3x6" pieces.

3. Cut the scrapbook paper.
I used my paper cutter to do it. You could also use scissors.
4. Accordion fold the paper.
I used two 4x6" pieces to make the larger (base) medallions and 3x6" pieces to make the smaller (top) medallions.

5. Fold each accordion in half.

6. Hot glue the center of the "fan."
Hold it tight for 10 seconds or so. Repeat with the other fan.
7. Apply glue to the outside of the fan.
Match two fans together. Try to line up the ends of each fan and the center portion of the fan. Then glue the other sides of the medallions together to make a circle.

8. Release the two pieces of paper so you have a medallion.
Glue the center folds of the medallion.
9. Make the center of the flower using the glass stones and burlap.
Cover the stones in burlap, then adhere with hot glue. Trim any excess burlap.

10. Glue the large medallion, small medallion, and burlap center together.
Use your hot glue gun to do this and make sure to hold in place for at least 10-20 seconds.

11. Glue each of your medallion flowers to the wreath.
Make sure to lay them out so they are even across the wreath, or lay them out however it strikes your fancy.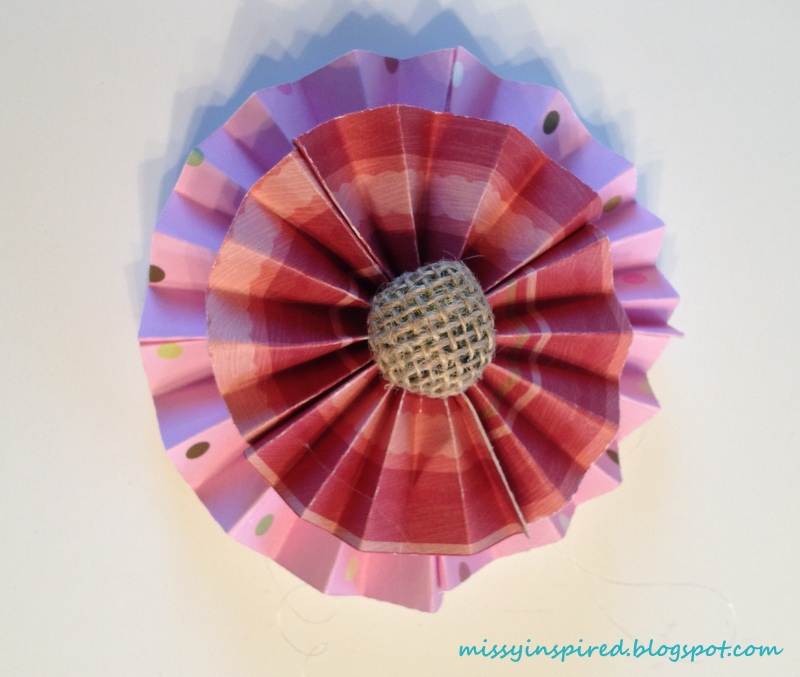
12. Make a "Spring" banner.
I cut pieces of burlap approximately 2x2". I then glued the burlap to the yarn. Then stuck the letter stickers to the burlap pieces. I used some hot glue to stick the letters to the burlap, to make sure they don't fall off.
13. Tie the banner to the wreath.
Then tie another short piece of yarn to the top so you can hang the wreath.
Link Parties
Click here to see the link parties I visit each week.
Subscribe to:
Posts
(Atom)


Subscribe To


Grab A Button

